In this unit, students will identify the properties of triangles, construct both equilateral and irregular triangles using either a ruler and protractor or ruler and compass, and make nets for 3D shapes (including platonic solids and solids made up of triangles).
- Construct triangles with specified dimensions using two different techniques.
- Design and construct nets for three-dimensional objects.
- Name basic three-dimensional objects, especially those made with equilateral triangles.
This unit explores some aspects of three-dimensional geometry as well as techniques for the construction of triangles.
The learning opportunities in this unit can be differentiated by providing or removing support to students and by varying the task requirements. Ways to differentiate include:
- deliberately scaffolding the steps in constructions of triangles
- allowing students to experiment with constructions in a digital platform
- directly modelling and instructing students on teh correct use of tools, especially protractors and rulers
- building simple polyhedra first before proceeding to more complex models
- allowing students to work in small, collaborative groups.
The context for this unit is mathematical. It is about triangles and their use in construction of 3 dimensional solids. Look for triangles in the environment surrounding your classroom (for example, in the bracing of frames in building, in the dome structures used for climbing frames, and in road signs, food, bridges, art etc.). You might. Iinvestigate the use of triangles in construction of culturally significant buildings like wharenui, Egyptian pyramids, the Louvre in Paris, and the biosphere environmental museum in Montreal. There may be other contexts involving triangles related to the interests and cultural backgrounds of your students, current learning from other curriculum areas, and current events that could be used to engage your students in this unit of work.
Te reo Māori kupu such as tapatoru (triangle), tapatoru hikuwaru (scalene triangle), tapatoru waerite (isosceles triangle), tapatoru rite (equilateral triangle), koki hāngai (right angle), ine-koki (protractor), putu (degree), matawhā (rite) (tetrahedron), and koeko (pyramid) could be introduced in this unit and used throughout other mathematical learning.
- Card or heavy paper for three dimensional constructions
- Rulers/compasses/pencils/protractors/scissors/selotape
- Model of a tetrahedron and other 3D shapes (digital or hard-copy)
- Examples of nets (plastic, card, or digital), without and with tabs, for other 3D shapes (e.g. cube, cuboid, cylinder)
- Toothpicks/popsicle sticks
- Blu-tack
- Paper for two dimensional constructions
- Copymasters One, Two, Three, Four, Five, Six, Seven, Eight and Nine
Getting Started
- Brainstorm with the class ”The properties of triangles”.
Possible responses might include:
Three sides
Three angles/corners
Angles add to 180o
Different types (scalene/isosceles/equilateral/right-angled) - Beware of students saying that triangles have all sides the same length or all angles the same. This is not a property of triangles, but a property of regular polygons (including equilateral triangles). Ensure that this is emphasised.
- Make connections between students’ knowledge of triangles and contexts that are relevant, real-life contexts. You could ask students to find images of triangles around the school, or online, or in their home environments.
- Ask students how they could construct an equilateral triangle. Discuss their ideas – their advantages and disadvantages. There are three relatively easy methods. Model these and give students the opportunity to try each (or demonstrate each to the class on the board).
- Method 1: Using ruler and protractor
- Draw one side to the required length, using a ruler.
- Measure an angle of 60 degrees from one end of the first side.
Draw a second side to the same length as the first, again using a ruler. - Connect the ends, measuring to ensure the third side is the same length as the first two.
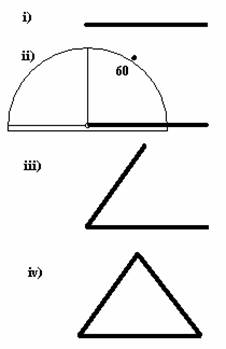
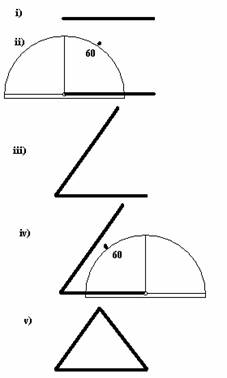
- Method 2: Using ruler and protractor
- Draw one side to the required length, using a ruler.
- Measure an angle of 60 degrees.
- Draw a second side through your mark at 60 degrees.
- Measure another angle of 60 degrees from the other end of your first side.
- Draw the third side and rub out any extra lines.
- Method 3: Using ruler and compass
- Draw one side to the required length, using a ruler.
- Set your compass to a radius equal to the length of the side. Put the point of your compass on one end of the side you have drawn and lightly draw a small arc about where you think the third corner should be.
- Move the point of your compass to the other end of your first side and draw another arc, which should cross the first.
- The point where the arcs cross is the third corner – draw in the remaining two sides, checking they are the correct length as you do so.
.jpg)
- Method 1: Using ruler and protractor
- Discuss whether you could use each method to construct triangles if the sides are not all the same. Get students to list advantages and disadvantages of each method, and decide which method is the best.
Method a) can be used to construct triangles as long as you know two side lengths and one angle.
Method b) can be used to construct triangles as long as you know two angles and one side length.
Method c) can be used to construct triangles as long as you know the lengths of all the sides.
Method c) is probably the easiest and most accurate, since measuring with a protractor is likely to produce errors. - Give students the opportunity to practise constructing a variety of triangles using all three methods. Whilst some students may feel confident enough to do this independently, others might benefit from working in pairs, or in a more-structured, teacher-led group. Consider which approach will best ensure that the learning content is accessible to all of your learners. For extension, students could create a paper or digital presentation (e.g. video, poster, set of slides, infographic) that demonstrates and explains each of these construction methods.
Exploring
- Show students a model of a tetrahedron.
- Ask them to identify what kind of shape and how many it is made up of (4 equilateral triangles).
- Ask students, working in groups, to use the toothpicks/popsicle sticks and Blu-tack to create a 3D model of a tetrahedron. As they build these shapes, roam and support them to identify the properties of the shape:
How many sides does the shape have?
What 2D shape forms the base of the shape?
If you unfolded this shape, what would it look like?
How many different arrangements of the unfolded tetrahedron could you make? - Pose the above questions to the whole class, and give students time to discuss their ideas, before sharing back to the rest of the class.
- Distribute paper. Challenge students, in the same groups, to construct the net, without tabs, for a tetrahedron. You might need to show students nets for other 3D shapes (e.g. cube, cylinder, cuboid) to ensure they understand what a successful net will look like. Remind students to think about the base shape of their tetrahedron models, how many sides there were in the completed shape, and what the “folded out” tetrahedron looked like.
- Check the nets that are drawn. There are two layouts of four equilateral triangles that will fold to make a tetrahedron and one that will not. Get students to identify why (two of the triangles fold to be on top of each other, so there is an open side).
These nets will make tetrahedron:.gif)
This net won’t make tetrahedron:
- Show students the examples of the nets with tabs. Allow them to make a model of a tetrahedron from card. Students should either join edges with tape, or if they wish could include tabs on their net and glue the edges.
Challenge students to make a different three-dimensional object from only equilateral triangles. Students requiring more teacher support can either design the net to make an octahedron (8 equilateral triangles – fold to make a shape like two square based pyramids joined together), or they could be provided with the net to cut out, fold and stick together. Students ready for extension could be asked to see how many different objects they can make, and name, from only equilateral triangles. There are at least 9!
4 sides: tetrahedron6 sides: triangular dipyramid (glue two tetrahedra together)8 sides: octahedron10 sides: pentagonal dipyramid (glue two pentagonal pyramids together)12 sides: snub disphenoid (split a tetrahedron into two wedges and join them with a band of eight triangles)14 sides: triaugmented triangular prism (attach three square pyramids to a triangular prism)16 sides: gyroelongated square dipyramid (attach two square pyramids to a square antiprism)20 sides: icosahedron24 sides: stellated octahedron (attach a tetrahedron to each face of an octahedron)Discuss the three platonic solids that can be made from equilateral triangles. How many of these has your class made?
Some nets you can print from the attached files and use are: tetrahedron, octahedron, icosahedron.A platonic solid is a polyhedron all of whose faces are congruent regular polygons, and where the same number of faces meet at every vertex.
In other words, a platonic solid is a three dimensional shape where each face is an identical flat shape with all sides and angles the same, and the same number of these faces meet at each corner.There are 5 platonic solids, the cube (6 squares, 3 meeting at each vertex), the tetrahedron (4 triangles, 3 meeting at each vertex), the octahedron (8 triangles, 4 meeting at each vertex), the dodecahedron (12 pentagons, 3 meeting at each vertex), and the icosahedron (20 triangles, 5 meeting at each vertex).- Look at some of the other objects students have made. Try to name them.
Challenge students to make an object that uses equilateral triangles in combination with a different shape. Point out that all the side lengths will need to be the same, even if the shapes are different. Support students, as necessary, to create at least one of the following shapes. Students requiring more teacher support can either be helped to design the net to make a triangular prism (2 equilateral triangles joined by three squares), or they could be provided with the net to cut out, fold and stick together. Students ready for extension could be challenged to see how many different objects they can make and name, and could find examples of these shapes from real-life contexts (e.g. diamonds, dice, terrariums, footballs, sculptures).
Some nets you can print from the attached files and use are: triangular prism, pyramid, pentagonal pyramid, cuboctahedron, truncated tetrahedron, truncated cube, icosidodecahedron.pyramid (4 triangles and 1 square)pentagonal pyramid (5 triangles and 1 pentagon)triangular prism (2 triangles and 3 squares (or rectangles))cuboctahedron (8 triangles and 6 squares)icosidodecahedron (12 pentagons and 20 triangles)truncated tetrahedron (4 hexagons and 4 triangles)truncated cube (6 octagons and 8 triangles)square antiprism (2 squares and 8 triangles)- Talk about the three types of pyramid (bases: triangle, square, pentagon). Has your class made all three? What do you call a pyramid with a triangle base? (tetrahedron) Could you make a hexagonal pyramid? (No) Why not? (the six equilateral triangles would lie flat on the hexagon and the object would be flat. Note: You can make a hexagonal pyramid, but not with equilateral triangles, you need to use isosceles triangles.
- Look at some of the other objects students have made. Try to name them. Ensure that all students have time and opportunity to share their thinking and work.
Reflection
- Ask students to name as many three-dimensional objects as they can which can be made using equilateral triangles.
- Can anyone think of ways we could group these objects? (Number of sides, other shapes used in the construction of the shape, symmetry)
The most obvious way is to group the objects into those that use exclusively triangles and those which include other shapes in combination with equilateral triangles. - Try grouping the models the class has made using some of these criteria.
Dear family and whānau,
This week in class we have been investigating making shapes with triangles. Ask your child to demonstrate how to draw a triangle using a ruler and protractor.
Ask them to tell you about some of the three dimensional objects that can be made using triangles.