This unit requires students to form generalisations about the areas of triangles and quadrilaterals. Through exploring the geometry of three and four-sided polygons, students look for relationships that can be expressed algebraically. At this level it is sufficient for the students to express these formulae in words rather than with symbols.
- Explore the relationship between rows and columns in finding the areas of rectangles.
- Calculate the area of rectangles, parallelograms, and triangles.
In this unit the students will discover how to find the area of some simple polygons by linking two central areas of mathematics – algebra and geometry. In finding rules, students are encouraged to use their spatial reasoning to find relationships between variables, such as length and height.
Area is the amount of flat space bounded by a closed two-dimensional figure. Squares are used as the conventional unit for measuring area because they cover the plane (flat space) with no gaps or overlaps. Standard units for area include square centimetres (cm2), square metres (m2) and square kilometres (km2). Rectangles are the easiest polygons for discovering area as the units can be arranged in rows and columns to form arrays. Methods to find the areas of other quadrilaterals, such as parallelograms and trapezia, can be found by considering ‘morphing’ of rectangles. Areas of triangles can be found by halving parallelograms.

Opportunities for formative assessment are embedded in the development of each task. The techniques used in the development of this unit allow students to focus on problem solving, reasoning, and communicating their mathematical ideas. There is a clear and purposeful intention to engage students in articulating their thinking and the thinking of others as a way of making sense of mathematical situations, techniques and generalisations.
Activities in this unit can be differentiated to cater for the current achievement levels and learning preferences of your studentsby providing or removing support, and by varying the task requirements. Ways to support students include:
- constraining the areas to numbers that make physical modelling of the area easy but still allow for many answers. Areas of 12, 16, 20, and 24 units are good examples because the numbers are highly composite (have many factors)
- acting out the creation and partitioning of shapes so students can predict when areas are the same and when they are different
- encouraging students to be systematic, to recognise the conditions that need to be met, and check back to see that the shapes they have created meet the conditions
- directing students to work collaboratively (mahi tahi) and share their ideas. Pairs and threes are effective. Require all students in a group to be the authority for that group so all students actively participate and justify their ideas
- using calculators with some students to reduce the cognitive load. This allows students to think more about the key concept of conservation of area.
This unit is mostly context-free and the only reference to a story is creating a pen with a fixed perimeter. You might choose to use contexts that are relevant to students in your class. Area is applicable to many real-life situations such as creating a vegetable patch, carpeting, or painting a room, designing a shed or a quilt (tapa cloth), or fencing paddocks or chicken runs. Give students the opportunity to apply creativity through creating their own shapes and finding the area.
Te reo Māori vocabulary terms such as horahanga (area), tapawhā rite (square), tapawhā hangai (rectangle), tapawhā whakarara (parallelogram), tapatoru (triangle), taparara (trapezium), mita pūrua (square metre), and mitarau pūrua (square centimetre) could be introduced in this unit and used throughout other mathematical learning.
- Dot paper, or geoboards and rubber bands
- Scissors
- Copymaster 1
- Copymaster 2
- PowerPoint 1
- PowerPoint 2
- PowerPoint 3
Getting Started
In this first session, the students investigate rectangles on dot paper but through the context of the rectangles that two students (Jess and Hannah) have made. Allow your class to collaborate in pairs as this helps to stimulate discussion, and supports students to clarify their ideas and resolve any problems.
- Pose the following problem:
Jess and Hannah are trying to solve a problem. They draw these shapes. Show PowerPoint 1.
What is the problem they are trying to solve?
- Focus the discussion on similarities and differences among the three shapes. Expect ideas like:
- They are all rectangles (What defines a rectangle? Four sides and four right angles).
- They are different sizes (How do you describe the size of a rectangle? Length by height)
- They have different perimeters (What is perimeter? Distance around the outside of the shape)
- By the end of the discussion your students should identify that the areas are the same (24 square units).
- Slide 2 of PowerPoint 1 shows how the square units tesselate to fill the rectangles with no gaps or overlaps (click to animate). Discuss how multiplication can be used to find the area and what the factors refer to.
For example, the area of the rectangle that has eight rows of three squares can be found using 8 x 3 = 24 or 3 x 8 = 24 (length x height is the usual convention).
- Challenge the students to complete the problem that Jess and Hannah are solving:
How many different rectangles can be made that have an area of 24 square units?
Give students copies of the square dot paper.
- After an appropriate time, bring the class together to share solutions. Slide 3 has all the possible rectangles and illustrates a systematic way to find them. It also shows that 4 x 6 is the same rectangle as 6 x 4 as one maps onto the other by rotation of a quarter turn.
- Ask the class to use the dot paper to draw all the different rectangular shapes that have an area of 36 square units? (Note: Some students may realise that they do not have to draw all the shapes to identify which ones will have an area of 36.) Do they also realise that a 6 x 6 square is a type of rectangle?
With the students construct a table which records the different rectangular shapes:
Rows
Columns
Area
1
36
36
2
18
3
12
4
5
6
9
12
18
36
- Have students complete the table and explain how their system of recording indicates all the different shapes that can be made that have an area of 36 square units. They could share with a partner, and then to the class.
Do you notice the point at which the rectangles are repeated?
For example, 3 x 12 is the same rectangle as 12 x 3.
What is the relationship between 6 and 36? (since 6 x 6 is the last discrete rectangle before repeating occurs).
Six is the square root of 36 (√36 = 6)
What do you think square root means? - Ask the students to use a table to find all the different rectangles that have an area of 64 square units.
- From the work that you have done so far, write a rule that would allow you to quickly find the area (in square units) of any labelled rectangular shape.
What is the area of these rectangles? (See PowerPoint 1 – slide 4)
A mathematician might write the area rule like this:
a = l x h
What does the rule mean? What does each letter, a, l and h refer to?
- Give students the following problem:
A rectangle has an area of 72 square units.
It has a length that is twice its height.
Draw the rectangle.
Students might make up a rectangle area problem like that for a classmate to solve.
Exploring
This section is divided into two parts. In Session A students discover the relation between the area of a parallelogram or trapezium and the area of a rectangle. In Session B, the area of any triangle is connected to a ‘surrounding’ parallelogram.
Session A
- Ask the students to draw a unit square (1 x 1) on their dot paper. Tell the students that each side of the square is said to have unit length and that the area is one square unit.
If the distance between each dot is 1 centimetre, what would you call the square? (1 square centimetre).
How do we write one square centimetre? (1 cm2)
If the distance between each dot is 1 metre, what would you call the square? (1 square metre)
How do we write one square metre? (1 m2)
You might like to show the actual size of the one square metre using 4 one-metre rulers.
(The aim of this task is to allow students to develop techniques that will help them to analyse the mathematical situations that they will meet in the rest of the unit.)
- Make a rectangle using cardboard strips and split pins.
Show by pushing the edges a little that you get a parallelogram.
What do we call shapes like this? (Parallelogram.)
What does a quadrilateral need to have to be called a parallelogram? (Two pairs of parallel opposite sides)
You may need to use the metaphor of railway tracks to illustrate the meaning of parallel.
Which is bigger, the area of the rectangle we started with or the area of the parallelograms as we pushed?
What would happen to the area if we pushed the rectangle right over?
Why would it have no area?
- Jess and Hannah wondered how they could find the area of any parallelogram. They reasoned that parallelograms must be related to rectangles when the heights are the same.
Why do Jess and Hannah think the heights must be the same? (As the rectangle was pushed, the height decreased, and the area decreased as well.)
Let’s start with a parallelogram. Can we turn it into a rectangle? How?
Show the first slide of PowerPoint 2. Let your students visualise how the parallelogram might be ‘cut and pasted’ to form a rectangle.
If you click on the mouse an animation will show the transformation.
Why do the two shapes have the same area? (The area of both triangles is the same)
Can you transform a rectangle into a parallelogram?
Show slide 2 and ask students to visualise cutting a triangle off the rectangle and translating it to the other end.
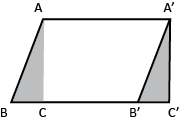
- Give students a copy of page 1 of Copymaster 1. Ask them to cut out each parallelogram and transform it into a rectangle, then calculate the area. Look for students to recognise that area remains invariant (does not change) as the triangle that is removed from one end is added to the other end.
- Gather the class to discuss a rule for finding the area of a parallelogram. If necessary, show why the area of a parallelogram can be found from a rectangle with the same length and height. This relies on the fact that the two end triangles in the diagram have the same area (triangles ABC, A’B’C’). This is easily shown by drawing a diagram and cutting out the triangles. One will fit over the top of the other. This shows that the parallelogram AA’B’B has the same area as the rectangle AA’C’C. An internet search for “parallelogram to rectangle gif” shows numerous short animations of this action.
The length and the height are needed to find the area of a parallelogram. Therefore:
area = length x height.
An important point to note is that height is measured using a line that is at right angles to the base. - Challenge your students with this problem:
Draw three different parallelograms that have an area of 60 square units.
The parallelograms must have the same length.
Or
Draw three parallelograms with the same height that have an area of 60 square units.
Could your answers to both questions be the same? Why?
Look for students to notice that ‘tilting’ the base rectangle but keeping the height the same conserves area.
- Ask the students to identify a connection between the areas of rectangles and trapezia. A trapezium has one pair of parallel sides.
Page two of Copymaster 1 provides many trapezia. By cutting out each trapezium, then cutting along the dotted lines, students can rearrange the pieces to form a rectangle.
How are the side lengths of the original trapezium and the rectangle connected?
In general, any trapezium can be transformed into a rectangle by cutting and pasting. The length of the rectangle is the average of the two different lengths of the original trapezium. The height remains the same.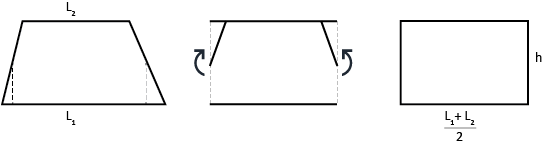
Session B
- Jess and Hannah wondered if the area of triangles is related to the area of parallelograms and rectangles. They investigated the area of right-angled triangles first – triangles with one right angle.
- Slide 1 shows an animation of how the two triangles might be put together.
How are the areas of the triangle and rectangle related?
Your students should note that the triangle is half the area of the rectangle.
How could we write a rule for the area of a right-angled triangle?
Record the rule as words or symbols, whatever the students come up with.
- Jess and Hannah realised that most triangles are not right-angled. They investigated the areas of other triangles.
Copymaster 2 provides two copies of different triangles. Ask your students to cut out the similar (same shape) triangles and put them together to make a quadrilateral.
What kind of quadrilateral is formed each time?
How is the area of the quadrilateral related to the area of the triangle?
Students should notice that a parallelogram can be formed each time. Slides 2 and 3 of PowerPoint 3 illustrate how one triangle can be joined to the other by a half turn and a translation (shift). Focus attention on the connection between the length and height of the parallelogram and the original triangle.
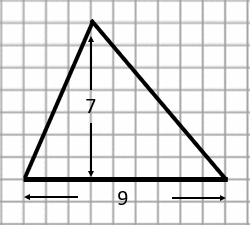
- Ask the students to write a short paragraph using pictures, to illustrate how to find the area of any triangle. Their work should include a formula (in words will do) for the area. (Area = half the base x height.) For example, the area of the triangle below is ½ x 9 x 7 = 31½.
Reflecting
Here the students use the formulae that they have obtained earlier to solve some problems.
Problem 1
Get the students to choose one of the shapes below, draw it on dot paper and find its area. The students can choose their own dimensions for the shapes. This can be done in at least two ways. By cutting it up into rectangles and by counting squares on the dot paper.
Problem 2
This problem could be adapted to suit the context of your learners. Instead of making a vegetable garden, students may be more interested in designing a rectangular classroom or playground. Consider what your students have recently been learning about, and are interested in, and try to make links to these areas.
You have been given 36 metres of string to ‘rope off’ a rectangular area that can be made in to a vegetable garden. What is the largest rectangular garden you can make?
Justify your choice, using diagrams and or tables of information.
Dear parents and whānau,
This week we have been exploring shapes and finding the formulas for rectangles, parallelograms and right angle triangles. Your child is to find one of each of these shapes around the house or make one of each from paper and calculate the area using a ruler and the formulas. Ask them to explain what they are doing and how the formulas are connected for these 3 shapes.